
How to Use PineConnector on Switch Markets - A Step-by-Step Guide
TradingView is a favorite charting platform for many traders, while MetaTrader (MT4/MT5) remains the standard for executing trades with brokers like Switch Markets.
Normally, bridging these two environments required manual effort or complex coding. However, PineConnector changes that by providing a seamless way to connect TradingView alerts to MetaTrader trades. And now, Switch Markets offers users free access to PineConnector.
In this guide, we’ll explain what PineConnector is, why it’s worth using (especially with Switch Markets), and how to set it up step by step. By the end, you’ll be able to trade directly from the TradingView charts you love, straight into your Switch Markets MetaTrader account.
What is PineConnector?
PineConnector is an integration tool (a combination of a cloud service and a MetaTrader Expert Advisor) that bridges TradingView and MetaTrader 4/5 for automated trade execution.
In simple terms, PineConnector catches your TradingView alerts and instantly relays them to your MetaTrader platform to execute trades. This means that when an alert triggers on TradingView, an order can be placed on MT4/MT5 within seconds, automatically.
It’s a cloud-based, lightweight solution with nothing to install on TradingView’s side, as the heavy lifting is done via PineConnector’s servers and the EA on MetaTrader.
In essence, PineConnector serves as the missing link between TradingView and MetaTrader.
Switch Markets has partnered with PineConnector to make this bridge even more accessible to its clients, offering the service for free (more on that below). But first, let’s look at why a trader might want to use PineConnector in their workflow.
In simple terms, PineConnector catches your TradingView alerts and instantly relays them to your MetaTrader platform to execute trades. This means that when an alert triggers on TradingView, an order can be placed on MT4/MT5 within seconds, automatically.
Why Should You Use PineConnector?
Before we walk through the installation process, let’s take a moment to understand why PineConnector is such a powerful addition to your trading setup.
1. Execute Trades Faster and More Efficiently
PineConnector significantly reduces the delay between signal and execution, assuming you use both platforms. There’s no need to fumble between TradingView and your MT5/MT4 terminal to place a trade. The moment your alert goes off, the trade can be executed for you.
PineConnector’s infrastructure processes alerts with typical end-to-end latency under 1 second, and can often execute orders within milliseconds under optimal conditions. For anyone who’s ever missed a trade while switching windows or dealing with slow manual order placement, this is a game-changer. And for those who want to reduce latency and get faster execution, Switch Markets also offers a free VPS for all clients who open a live trading account.
2. Seamless Trading Experience on TradingView
Many traders prefer TradingView for its powerful charts and easy alert system. PineConnector allows you to stay on the TradingView platform for analysis and signaling, without manually logging into MetaTrader every time to execute trades.
You set your alert once, and PineConnector handles the rest. This not only saves time but also lets you focus on strategy and analysis, using TradingView’s interface, while trades happen in the background on Switch Markets’ MetaTrader platform. No more juggling between platforms.
3. Flexibility for Different Trading Styles
Whether you trade manually, use automated Pine Script strategies, automate your trading with an AI trading bot, or just want an efficient one-click execution, PineConnector has you covered. You can use it with simple manual alerts (e.g., an alert on a trendline or indicator crossing that you set through TradingView’s interface), which is great for discretionary traders who don’t code.
Alternatively, if you do have a custom Pine Script strategy, PineConnector will execute its buy/sell signals on your Switch Markets account in real-time, so you get the benefit of algorithmic trading without having to rewrite your strategy in MQL for MetaTrader.
Setting Up PineConnector - A Step-by-Step Guide
Getting started with PineConnector on Switch Markets is straightforward. In fact, most users can go from zero to a fully functional setup in under 10 minutes. Below are the steps to set everything up:
Open a Switch Markets Account and Deposit at Least $50
If you aren’t already trading with Switch Markets, begin by signing up for an account on their website and funding it with the minimum $50 (or more) needed to qualify for the free PineConnector offer.
This is a one-time deposit requirement to unlock PineConnector. There are no extra fees or promo codes involved.
Switch Markets is a regulated broker, so your deposit is safe in a tier-1 bank as you get started. All you have to do is click on the link below and open a live trading account.
Create a PineConnector Account
Next, go to the PineConnector official website and sign up for an account. You can start with their free trial (no credit card is required for the trial period).
Make sure to use the same email address for PineConnector that you used for your Switch Markets account (this will make the verification easy). If you already had a PineConnector account from before, that’s fine too; just ensure the email matches your Switch Markets account email.
The PineConnector portal is where you’ll later download the EA and find your license ID, but you don’t need to do anything there just yet, except have the account ready.
Activate Your Free PineConnector Plan Via Switch Markets Support
Once you have a Switch Markets live account with $50+ deposited and a PineConnector account registered, the final step is to connect with Switch Markets’ support to activate the offer.
Simply reach out through their Live Chat (available on the website) or email support, and let them know you’ve deposited and have a PineConnector account set up (provide them the email you used). The support team will quickly verify your account and upgrade your PineConnector account to a full paid plan for free. There’s no lengthy process. They handle it on the spot, usually within minutes.
Once they confirm activation, your PineConnector subscription is live at no cost to you.
After completing the steps above, you should now have everything in place account-wise: a Switch Markets account (with the PineConnector offer enabled) and a PineConnector login with an active license. The next stage is to connect the PineConnector Expert Advisor (EA) to your MetaTrader 4 or 5 platform, which we’ll cover in detail below.
How to Connect PineConnector EA to MetaTrader 4/5
Once your accounts are set up, installing and configuring this EA is a one-time process. The procedure is very similar for MT4 and MT5 (PineConnector provides a different EA file for each, but the steps are alike). Here’s how to get it connected:
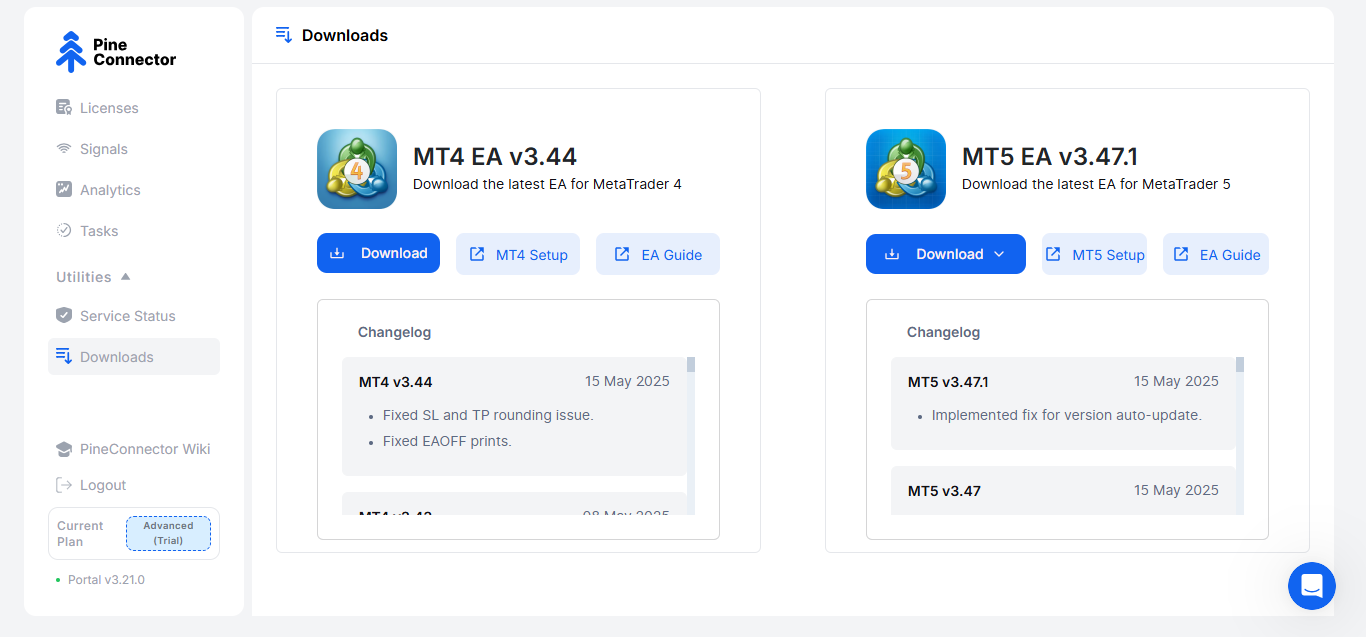
Download the PineConnector EA
First, log in to your PineConnector account (the portal) and navigate to the downloads section. Download the appropriate EA for your platform – MT4 EA for MetaTrader 4 or MT5 EA for MetaTrader 5. The download usually comes as a ZIP file containing the EA and any necessary support files (like a DLL for MT5). Make sure to remember where you saved this file.
Install the EA into MetaTrader
Open your MetaTrader terminal (MT4 or MT5) provided by Switch Markets. In MetaTrader, go to the top menu and click “File > Open Data Folder.” This will open the data directory on your computer. Navigate to the MQL4Experts folder (if you’re using MT4) or MQL5Experts folder (if you're using MT5).
Now, extract or copy the PineConnector EA files from the downloaded ZIP into the Experts folder. For MT5, ensure both the PineConnector-MT5-EA.ex5 and PineConnector-MT5-DLL.dll (or similarly named files) are placed directly inside the Experts folder (not in a subfolder).
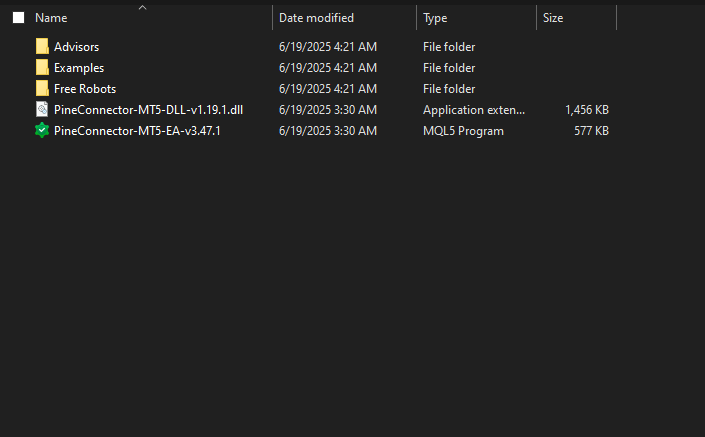
For MT4, you’ll have an .ex4 file (and possibly a DLL) to place in Experts. Once the files are in place, close the file explorer.
Enable DLL Imports and Auto-Trading
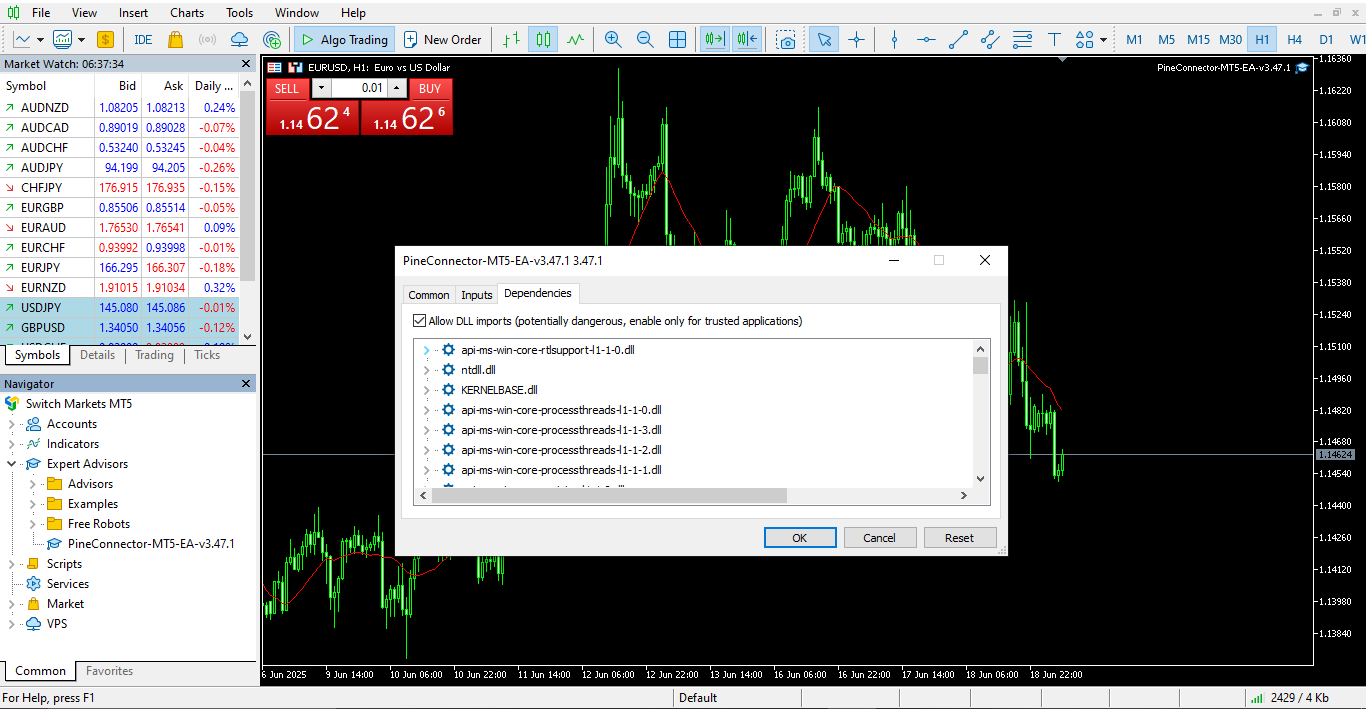
Back in your MetaTrader application, you need to adjust a couple of settings so the EA can run properly. First, go to Tools > Options > Expert Advisors tab. Check the option that says “Allow DLL imports” and click OK. This permission is necessary because PineConnector’s EA uses a DLL to communicate with the PineConnector servers.
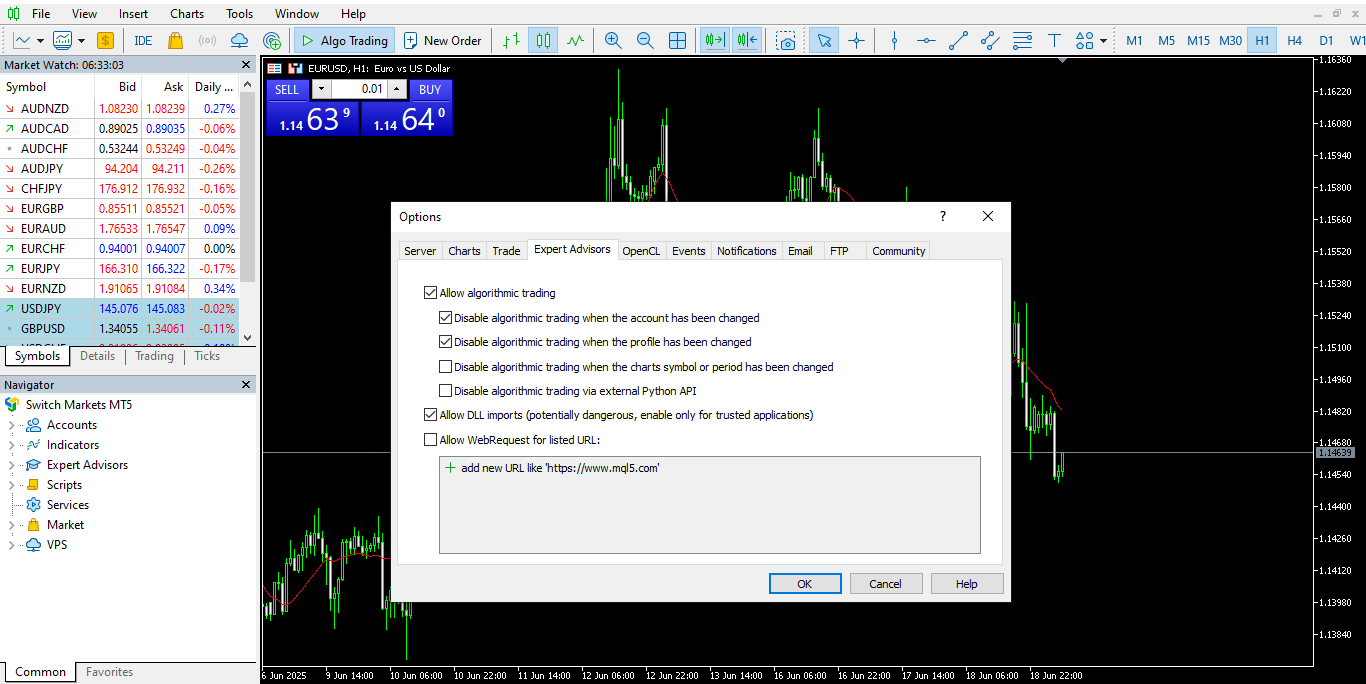
Next, ensure algorithmic trading is enabled globally: look at the “Algo Trading” button (MT5) or “Auto Trading” button (MT4) on the top toolbar. It should be green or active. If it’s red/off, click it to turn it on. This allows EAs to run and trade.
Load (Attach) the PineConnector EA Onto a Chart
In MetaTrader’s left-side Navigator panel, find Expert Advisors and hit “Refresh” (so it detects the new EA you just added). You should see PineConnector in the list of EAs now.
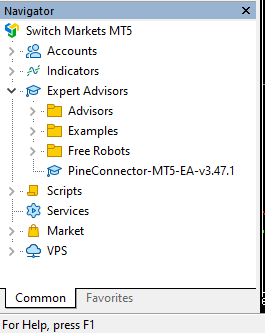
Open any chart (e.g., EUR/USD on any timeframe). It doesn’t matter which, since PineConnector can manage trades for all symbols from one chart.
Then, drag and drop the PineConnector EA onto this chart (or right-click the EA and choose “Attach to Chart”). A dialog box will pop up with the EA’s settings.
Configure the PineConnector EA Settings (License ID)
Upon attaching, you’ll see the EA’s Properties window. Under the “Common” tab, double-check that “Allow live trading” (MT4 term) or “Allow Algo Trading” (MT5) is ticked, and “Allow DLL imports” is ticked (these should already be set from earlier steps, but it’s good to verify).
Now, go to the “Inputs” tab. This is where you need to enter your License ID. Log in to your PineConnector portal in your browser and find your unique License ID in the dashboard (it’s usually a long numeric code). Copy that number and paste it into the License ID field in the EA’s Inputs.
You can also adjust other input settings here if needed (PineConnector EA has various parameters for things like risk management or symbol mapping, but those are optional tweaks. By default, it will work out of the box).
After entering your license, click OK to close the settings. The EA will now initiate a connection to PineConnector’s server.
Verify The Connection
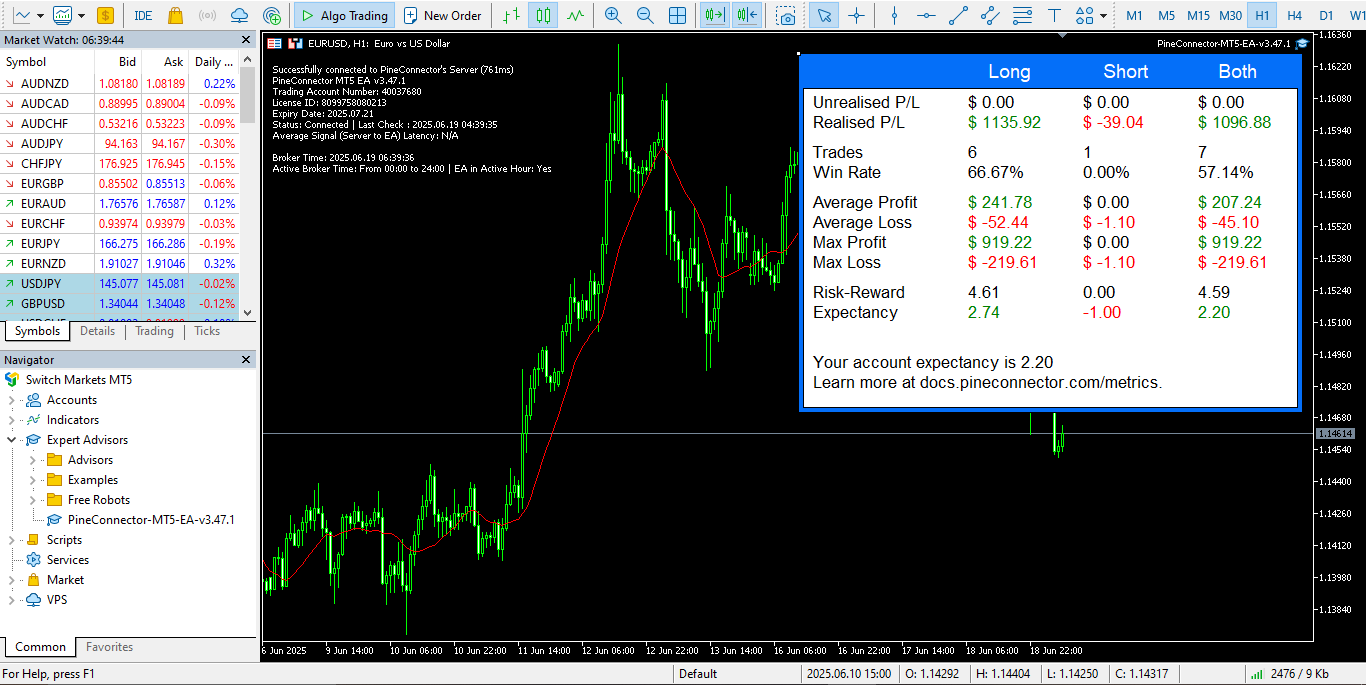
Last step. Look at the top left of the chart (or the Experts/Journal log) for a confirmation message. If everything is set up correctly, you should soon see a message on the chart saying “Successfully connected to PineConnector’s Server”, along with details like your account number and license expiry date. This indicates your MetaTrader is now linked with PineConnector.
From this point on, any TradingView alert that you direct to your PineConnector (via webhook) will be received and executed by this EA on your Switch Markets trading account.
If the connection does not succeed on the first try, don’t panic. Double-check the steps: Is your License ID correct? Did you enable DLLs and algo trading? Also ensure you’re running MetaTrader on a Windows environment that’s compatible (Windows 10/11 or Windows Server 2016/2019/2022 are recommended for the EA).
Occasionally, a restart of MetaTrader (or the VPS/PC) can help if the EA doesn’t initialize properly. The PineConnector documentation’s EA installation guide provides troubleshooting tips if needed. Once connected, you can proceed to set up TradingView alerts to actually trigger trades.
For example, by creating an alert with a webhook URL and a message that PineConnector understands (like a simple “buy” or “sell” signal with parameters). PineConnector’s docs have a syntax guide for how to format alert messages, but a basic alert could be as straightforward as: BUY EURUSD 1 lot; TP=50; SL=50;. Whenever that alert triggers on TradingView, the PineConnector EA will execute the corresponding buy order on MT4/5.
At this stage, congratulations! You have effectively linked PineConnector with your Switch Markets MetaTrader platform. Now you can trade from TradingView without manually intervening on MetaTrader at all.
If you find it easier to watch a tutorial on how to connect PineConnector to MetaTrader 4/5, you can watch the video below:
Final Word
In this guide, we’ve walked through what PineConnector is, why it’s useful, and exactly how to set it up. The process might have seemed technical at first glance, but hopefully, you’ve seen that it’s quite manageable, even if you’re not a programmer.
Once configured, PineConnector runs in the background, quietly doing its job. You’ll likely wonder how you managed without it, no more missed opportunities because you were away from the keyboard or because you couldn’t click fast enough. Instead, your TradingView alerts become truly actionable, live on your Switch Markets account.
In closing, using PineConnector on Switch Markets’ platform can be a game-changer for those who want to leverage TradingView for live trading. It brings speed, consistency, and convenience to your strategy.
As with any tool, take some time to test it on a demo and get comfortable with how alerts translate to orders.
Open a Free Demo Trading Account
FAQs
You’re almost ready to start trading with PineConnector. But just in case you still have a few questions on your mind, here are some quick answers to the most common ones traders ask.
Is it safe to use PineConnector?
Yes. PineConnector is considered safe and is used by thousands of traders worldwide. It doesn’t have any access to your funds; it simply listens for the alerts you specify and executes them via the MetaTrader API (through the EA). However, if you have any concerns about your safety, you can use our free VPS, which is an essential tool for traders.
What is the latency of PineConnector?
One of PineConnector’s strengths is its low latency. In plain terms, latency is the delay between your alert firing on TradingView and the trade executing on MetaTrader. PineConnector’s infrastructure is optimized for speed, with a typical end-to-end latency of under 1 second.
Is it difficult to integrate PineConnector to MT4/5?
Not at all. Despite how it might sound (“TradingView to MetaTrader integration” does seem technical), the actual process is user-friendly and well-documented.. You don’t need any programming skills or special tech knowledge. It’s mostly copy-pasting files and clicking a few options in MetaTrader, which most traders can do easily. The majority of users get everything working within minutes. Yet, if you need help, we are here. You can contact our support team, and we'll help you with anything you need.
Risk Disclosure: The information provided in this article is not intended to give financial advice, recommend investments, guarantee profits, or shield you from losses. Our content is only for informational purposes and to help you understand the risks and complexity of these markets by providing objective analysis. Before trading, carefully consider your experience, financial goals, and risk tolerance. Trading involves significant potential for financial loss and isn't suitable for everyone.